Showing posts with label Baby Quilt. Show all posts

Tuesday, 6 August 2019

Foxy Four Patch Baby Quilt (Part 4) Quilting and Binding

It took me ages to settle on the quilting method for this baby quilt. I tried some quilting samples using the machine, but wasn't happy with how it looked.

I wanted to go for something more delicate and "handmade" looking.

After unpicking lines of machine stitching and lamenting over my strategy, I found some Sue Spargo Embelishment Perle threads at Honeysuckle Patchwork in Bendigo and a beautiful orange gingham backing fabric.

A sample line of top stitching cemented my thinking and some tailors chalk kept me on track.


Really happy with how the stitching looked. I opted not to go through every square vertically, but I did every horizontal line of stitching. I liked the way that it looked.


Binding was done with orange home spun. I sew a 2.5 inch width strip of fabric (folded over so that it is 1.25 inches in width) sewn to the edge of the quilt and then I hand stitched around the edge of the quilt. I am hopeless at doing binding corners, so I just do one side at a time and try and make it look as neat as possible. I like the heaviness of the jelly roll strip binding.


The quilt has now been washed, pressed and gifted and it awaiting the arrival of it's new human!

Moving onto the next project!

Tuesday, 25 June 2019

Foxy Four Patch Baby Quilt (Part 3) Border Sash

The next section to the quilt top is to decide how you want to sash or border your quilt.

Different colours or combinations will create different effects. An orange border will make the orange patches jump out in a different way to having a grey border.


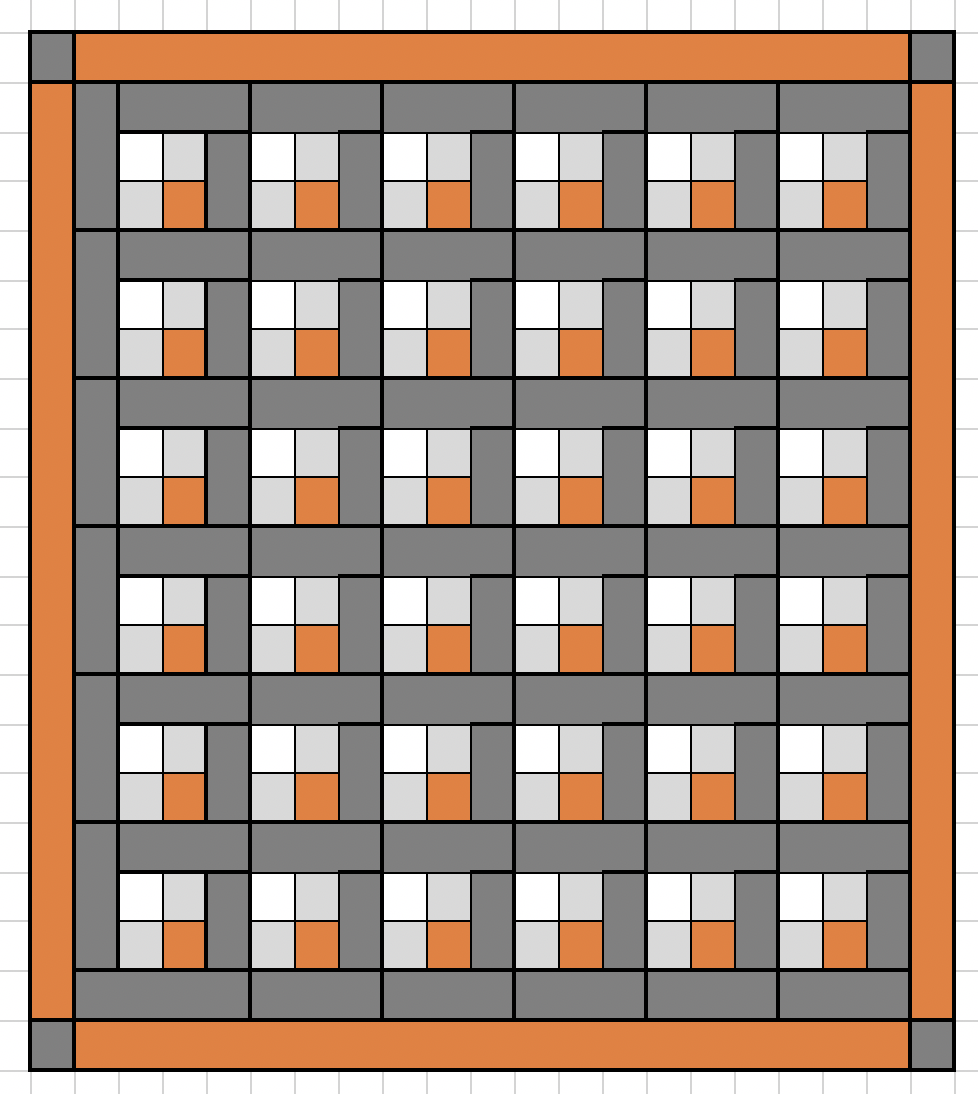
You can sash the patchwork in the same colour, but I've opted to give each corner a small 2.5 inch square.

Sewing the sash

Sew the sashes onto the opposite sides of the quilt.


Then prepare a sash to be sewn to the top and bottom of the quilt. Getting the seams to line up might be a little tricky.


When attaching the top sash, I don't fully sew attach it. I use the iron to work out where the seam will be and then I trim and sew the corner square in place.


One the corner square is on the sash, finish attaching the rest of the sash to the quilt.

Voila! A finished four patch baby quilt.


Time to think about how to quilt it!

Thursday, 30 May 2019

Foxy Four Patch Baby Quilt (part 2) Constructing the patchwork rows

When working a piece of patchwork there are some big decisions that need to be made.

Do you create each four patch block, sash it and join it together (A) or sew half the sash to the four patch block and run a strip along the top of the blocks (B)?

Certainly (B) is a lot faster in the short term, but consider the advantages from doing (A).

Option A


If you make each individual block you can measure and trim with your rotary blade to tidy up any uneven sewing. When sewing the sections together make sure that your seams line up.

For ironing, I pressed the seams open on the initial four block design and then with the grey sash, I pressed the seam into the block to add a bit of bulk. The key to seams is being consistent throughout the whole project, however, many would argue that seams need to be pressed open.

Option B 

The B option, even through it seems easier, can lead to misalignment of seams running from the top to the bottom of your quilt.


I tend to like to construct each row using the method described in A, it gives me a chance to line up all the blocks and the extra seam at the top of the row allows me to line up the next row more easily.

It also means that you can either construct it as a row of blocks or a cluster of four blocks.


When I was putting this quilt together, I initially created a cluster of four blocks to see what the design looked like. This picture looks a bit squeegee because I haven't trimmed or steamed out the blocks yet to get them to align properly.


One of the reasons why I am reluctant to sew with my son around is because when doing patchwork you are continually sewing and ironing. So the iron is on all the time; set at cotton with lots of steam.

Nicholas is quite uneasy on his feet and when he starts wandering around the house, looking for cookies or a drink, he wants to get involved in what I am doing; which means moving parts on the sewing machine and a hot steam iron.

My anxiety levels go through the roof and sewing no longer becomes the joyful escape that it once was many years ago. But with him out of the house I can relax and enjoy the process, even though I tend to work like a demon to get my projects finished!

Ironing

The ironing is the most important part of making a quilt. You can use a hot steam iron to stretch fabric to line up seams or shrink fabric to meet a seam.

Creating each of the four patch blocks with grey sashing individually means that there is less likelihood of seams looking a bit off. You can steam and trim each block using your rotary cutter and ruler and make sure that things like up; as you go.


If the seams are a not straight, spray the block with water and use the steam iron to straighten them up. Iron until dry and press the back seams open. If you are pinning together blocks to sew them together and they are not aligning properly, pin them and then give the cotton a shot of steam to either stretch or shrink the fabric.

Here are some links about ironing and patchwork.

End of the row sash

Once you have finished a row, add the end sash.


Create 5 rows that look like this:


On the sixth row we will add the bottom row of sashing.


The inside of our quilt should look like this:


Press with an iron and trim the outside of the quilt ready for the border sash.

Tuesday, 28 May 2019

Foxy Four Patch Baby Quilt (Part 1)

Sewing and crafting is such a rare occurrence for me at the moment.

My son was given the opportunity to go on a weekend camp through one of the NDIS providers. So out came the sewing machine, a quick visit to Lincraft on the way home and I was set for a weekend of crafty goodness.

 Fabric selection from Lincraft

1 metre of the foxy fabric
2 metres of each of the greys
1 fat quarter of grey gingham
1x spool of grey thread

Here is the plan .... to make a four patch repeating block for a baby quilt.


Fussy cut the foxes out (the longest part of this process) and block each four patch with the darker grey.


I only had one fat quarter of gingham, so I had to use it sparingly.  


Tuesday, 25 January 2011

Monochromatic Sampler: Block One Tutorial

I started doing the blocks for my Monochromatic Sampler on Saturday and since then have unpicked and re-sewn them. Why? I bought myself a 1/4 inch seam foot for my machine and I have decided that I don't like it. I would much rather use the regular foot, my masking tape seam allowance and press and trim to make sure that I get the fabric widths right. It does mean that I end up with lots of off cuts. But my daughter and her craft table doesn't seem to mind!


I guess I started with a simple block. For this one I cut two strips of 1 1/4 inch width sashes from your fabric. Or one 2 1/2 inch sash in half from a Jelly Roll.

First Row

For this block I started in the centre and I worked out. Cut two strips of 1 1/4 inch width pieces of fabric with your rotary cutter and rather than cut each section exactly, sew and trim.


Second Row

Once your first row is completed, press and trim and continue on with the sewing. Because this block is quite fiddly, rather than double back at the end of each row, reduce the stitch length. I use a little scrap of fabric at the end of each row that I sew onto after I have finished my stitching to hold the thread and reduce thread waste.

Third Row

It is important inbetween each row to square up your sides and make sure that your block has right angles.

Fourth Row

I decided that I would press my seams into the black areas of these blocks rather than press them open. Why? Given that I am dealing with so much white, it just looked neater and it makes the black sections look raised. I haven't decided what type of quilting to do just yet.


Fifth and final row

The last row is in 2 1/2 inch sashes. I fear that when I have all the blocks done, I will then trim this down, but until I know the exact sizes of my blocks this is what I am running with.


Finished width for my block was 10 3/4 inches which I might trim down to 10 1/4 once all the other blocks are done for the wall hanging.

Sunday, 23 January 2011

Monochromatic Sampler

I've been kicking around a few ideas for a quick quilt project for the new baby. I remember reading all about infant eye developement when we had Victoria and how when babies are born they cannot see in colours, only black and white. As their eyes develop, they can see grey and then depth perception develops.

Using the following site as inspiration, it seems like an ideal opportunity to do a touch of quilting with some techniques that I haven't used before, such as creating a pin wheel. There is only one block that is appliqued, which is the stars. Every other block is using patchwork techniques, hence the idea of calling it a sampler.


Given that I am not a "deer and bunnies" quilter, a monochromatic quilted wall hanging beside the cot seems like a good idea to me. I haven't quite got my head around how I might join these pieces, but I might start making the blocks and see where it leads me.

I have two weeks to finish this project!

Sunday, 24 October 2010

Jelly Roll Baby Quilt Tutorial

I had a few friends around yesterday for a bit of a quilting/sewing day. I started on another baby quilt. This time using the jelly roll that I got from Green Fairy Quilts.


The idea was to use 16 different strips and path them together into colourful blocks.


But if you look closely, you can see that there are 4 squares that are not from the Punctuation range, they are from an older Moda range called Breath of Avignon. When I sat back and looked at the colours, I decided I wanted more solids.

So in a bid to document a bit more what I am doing, here was my process:

1. Take 16 1/2 strips of different colours and sewed them into blocks of 4, use the full strip if you want it to be a larger quilt.


2. Pressed them out and then with my rotary and ruler cut 2.5 inch strips.


3. Once you have your different strips cut, then sew them together. For my quilt, I mixed up the order a bit in each block. But for the purpose of this tutorial, I am not going to mix the colours up.

4. Once you have your 9 or more blocks, start to add the sashing. I cut a length of Kona Solid Snow at 2.5 inches and then sewed each block to it, pressed it with the iron and THEN cut the individual blocks. In the end I had a stack of blocks that looked like thi.

5. Trim each of your blocks so that they are nice and straight using your ruler and rotary cutter and start assembling the rows of patchwork. Adding a sash to the top of the row so that you have three rows with top and side sashing. The bottom row gets a bottom sash. If you complete each row at a time, the off cut from the large horizontal sash, should be enough to do one of the vertical sashes.


6. Once you have sewn the main part of the quilt together to make it bigger you can add a few more rows of sashing. I am thinking of doing something different and adding different colours to border my baby quilt from the Punctuation range. What do you think?


7. Once you have finished the top, then it is time to baste to batting and a backing colour and then bind. I am thinking of doing some patchwork binding from the left overs, so that it isn't the same colour all around, but patches of the colours that are inside. I am not sure yet. More details later!

What do you think?
Has this tutorial been handy?
Please let me know if my instructions are clear!

Sunday, 10 October 2010

Baby Quilts Bound for Germany

I finally finished the binding last night on the two baby quilts bound for Germany next week.


I quite like the one with orange binding and top stitch, but I rushed a bit on the stipling and I am not 100% happy with the outcome. The sashing is Kona Cream Solid from Pink Chalk and the backing fabric is the same bamboo print I used around the outside sashing on the front from GJ's in East Brunswick.


The blue/brown one is a replica of another quilt I made a while back but in different colours. The majority of the fabrics come from another "Vintage Jelly Roll" from Spotlight with sashing in the Kona Cream Solid. The fabric is made in india and I probably won't buy it again as the cutting of the 2 1/2 inch sashes were a bit wonky.


The stipling is all swirly and made with a verigated thread that I got at the Craft Expo yesterday and quite easy and relaxing to do as it is easy to hide mistakes (unlike straight stitches).


Today is an ideal washing day for quilts, so I popped them both in the washer just to make sure that the stitching is up for the job. Then any minor repairs can be done before they leave on Thursday.

Tuesday, 5 October 2010

Lion sleeps tonight

In between all the school and book stuff I have been doing, I have been trying to get this quilt finished so that it can go to gGrmany next week. A baby quilt gift for my husbands cousin.


The middle "feature print" is a Japanese medium weight bought from Purl's Palace in Daylesford. The surrounding material is scraps from a scrap pack bought from The Rabbit and The Duck at one of the North Melbourne markets.


I'm starting to do the stippling ... and have decided to do it horizontally with a line of hand stitching inbetween each row. This time I have also set the stitch length at 3.5


The plan is to do some more machine stippling in between working tonight and then the hand stitching tomorrow during our "calm time" at school.

I might have a go at doing this one again, but next time not using 1 1/2 inch strips. Very fiddly!

Tuesday, 14 September 2010

Another Baby Quilt

I started this quilt ages ago and I basically didn't like how it looked.


So I unstitched the blocks and re-worked them and now much happier with how the purple quilt. Still not sure how to back it, but I do need to get my skates on and finish this one.


Sides still need trimming, but you get the idea ;-)

Sunday, 12 September 2010

Working with Charm Squares

I go through different stages of wanting to do patchwork quilt tops and then I will spend sometime just doing batting/quilting. So I generally have a few quilts on the go at any one time. Yesterday was a quilt top day, so I decided to try a technique that I have read about, but never tried.

I started off with nine charm square blocks, each 5 inches x 5 inches. Sewed them together to make a large block.


Once sewn, press and then slice into four even sections. I used my quilting ruler to measure 2 and 1/4 inches in from one of the middle seams.


Once sliced rotate 90 degrees or 180 degrees to create a new pattern. I have found that it is imperative to pin the seams together that you want to line up before you sew them. I know that this sounds strange, but when I sew I hardly use pins unless doing curved seams.

When you are joining the bigger blocks together, pin the matching seams and then if they don't match up 100% give the blocks a blast of steam from your iron and the fabric will either shrink or stretch to match up.


Here is the result of my efforts!

Not sure what I am going to back it in yet .. might get more of the red/orange dots to back the quilt or look for a red/purple to match the front. The colour scheme came from the red and purple on the spiders body.