
The construction of the Pinwheel block uses a similar technique to the Diamonds block. Create a square and rotate it by putting triangle sides on it.

Create the Pinwheel
Cut:
- Two squares 3 1/2 inches square in White
- Two squares 3 1/2 inches square in Black
Pin both squares together and rule a line from opposite corners of the squares.
Use this line as a guide to run a stitch down the squares either side of the line. Seam allowance 1/4 inch.

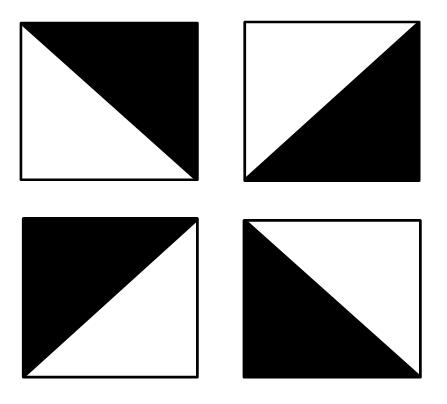
Cut down the centre of the stitching and then open and press with your iron. You should have four squares ready to go!

From each square, you should get two blades on your pinwheel. Sew blocks together carefully making sure that you line up your seams.


From each square, you should get two blades on your pinwheel. Sew blocks together carefully making sure that you line up your seams.

If your seams match up correctly, you should have a nicely lined up pinwheel measuring 6 inches squared.

Cut:
- Two squares measuring 4 1/2 inches square in White
Cut the squares in half and attach two to the sides of the pinwheel. Trim and then attach the last two triangles.

You should have a nice sexy pinwheel ready for a border! Trim your pinwheel border leaving at least 1/4 inch between the edge of the pinwheel and the outside of your square. My finished square finished at 8 3/4 inches squared.

Cut a 2 1/2 inch width strip and attach a border to your pinwheel.

Voila, another finished block!

I haven't given much thought yet as to how I might quilt this piece, any ideas? I'd love to try freehand quilting like Kellie does, but I am not that confident!


1 comment:
My music quilt is waiting patiently to be sandwiched so I can quilt it, but I too am a bit hesitent to freehand quilt it.
Last night I made a mini quilt sandwich (with a charm square) and had a go, I wasn't nearly as bad as I thought I would be! I just did the random stippling (like Kellie's header picture) rather than a specific pattern, but it looked okay. Need to practice a little more with different size curves but I think I'll be ready to tackle the big projects sooner than first thought. Oh, and I have some tension issues to work out too!
I say, grab a spare charm square (or cut one of boring fabric) and just jump in and have a go!
And I LOVE Kellie's work. Hoping to make it to a workshop one day.....
Post a Comment