Showing posts sorted by relevance for query Monochromatic. Sort by date Show all posts

Wednesday, 26 January 2011

Monochromatic Sampler Flickr Group

If you are following along with the Monochromatic Sampler, I have set up a flickr group where you can share pictures and discuss things to do with the Sampler.


I've made a dodgy logo to go along with the Sampler as well (clear to see that I don't have good photoshop skills).


The process goes like this (for blogger blogs):
  1. Log into your blog.
  2. Go to the Layout tab.
  3. Click on Add Gadget, choose Text.
  4. From the dialog box you should see a list of gadgets that are classed as Basic. Choose Text by clicking on the plus [+] sign.
  5. Click on Edit HTML and then paste in the Monochromatic Sampler code above.
  6. Save and voila! You now have an icon on your blog that tells people you are a part of the group! Click on the icon to test it and it should take you to the Flickr group.
Don't forget to let us know if you are joining in on the Sampler fun by leaving a comment. Feel free to join along for one or two blocks or the whole quilt, but remember to post your block images to the flickr group.

The blocks don't have to be black and white, this is just the colour scheme that I have chosen to adopt because of the new baby.

Wednesday, 9 February 2011

Monochromatic Sampler: Block Four Tutorial

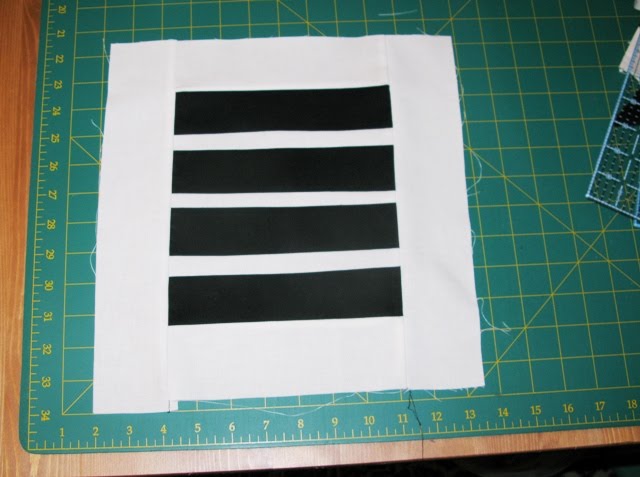
This block is the easiest! Basically a whole stack of stripes!


Cut
  • Three strips of 7 1/2 length by 1 inch in White
  • Four Strips of 7 1/2 length by 2 inches in Black
Sew together

Sew together the three white strips with a black strip until you have three stripes.


Then attach all of them together, attaching the left over black strip at the bottom.


Sashing

Cut
  • A strip of 2 1/2 inch width by the length of your material (42 inches).
Add sashing to the top of the block and then sides of the block.

Looking back at my block, I should have done sides first then the top and bottom. But when I constructed the block, doing the top and bottom and then sides seemed more logical. It's upto you!


Trim the sashes to complete the block. Remember that when we construct the quilt, we will probably trim all the blocks down to one uniform size.

Voila! Finished!


Are following along with the Monochromatic quilting adventures?

Sunday, 23 January 2011

Monochromatic Sampler

I've been kicking around a few ideas for a quick quilt project for the new baby. I remember reading all about infant eye developement when we had Victoria and how when babies are born they cannot see in colours, only black and white. As their eyes develop, they can see grey and then depth perception develops.

Using the following site as inspiration, it seems like an ideal opportunity to do a touch of quilting with some techniques that I haven't used before, such as creating a pin wheel. There is only one block that is appliqued, which is the stars. Every other block is using patchwork techniques, hence the idea of calling it a sampler.


Given that I am not a "deer and bunnies" quilter, a monochromatic quilted wall hanging beside the cot seems like a good idea to me. I haven't quite got my head around how I might join these pieces, but I might start making the blocks and see where it leads me.

I have two weeks to finish this project!

Monday, 7 February 2011

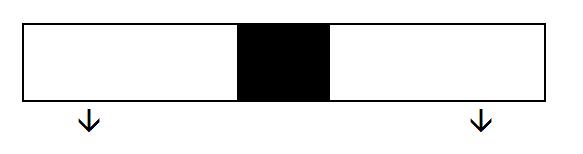
Monochromatic Sampler: Block Three Tutorial

I have effectionately named this block "building blocks". I could imagine that in another quilt you could applique numbers or letters onto the blocks and create a nice effect.


The concept seemed a lot easier on paper when I first drew it. My first attempt at this block resulted in a block that was too small. So I unpicked it and re-did it to made the sides of each row longer than the 10 1/2 inch square block so that it can be trimmed down at the end once all the other blocks are done.

Cut a few strips of white and black at the standard width of 2 1/2 inches.

Row One

We'll start with the row with three "building blocks" and work our way up the block.

Cut:
  • Three pieces of 2 1/2 inches by 2 1/2 inches in Black and
  • Two pieces of 2 1/2 inches by 1 1/4 inches in White.
Sew together but remember to press, measure and trim after each line of stitching.


Complete the row by attaching two blocks of 2 1/2 by 2 1/2 in White either side of the three blocks.


Once finished add the spacer to the top of the row.

Cut
  • 12 1/2 inch length of your 2 1/2 inch sash and cut it in half. We will use one half for the Row 1 spacer and the other half for the Row 2 spacer.
Attach spacer to the top of the row, press, measure and trim if needed.

Row Two

Cut
  • Two 2 1/2 by 2 1/2 blocks in Black and
  • one piece of 2 1/2 by 1 1/4 in White.
Sew together but remember to press, measure and trim after each line of stitching to make sure that your black blocks are 2 1/4 inches in width before sewing on the sides.


Complete the row by attaching two blocks of 4 inches by 2 1/2 in White either side of the two building blocks.


Once finished add the spacer to the top of the second row. Use the second half of the spacer from Row One, 12 1/2 inches by 2 1/2 inches in White.

Attach spacer to the top of the row, press, measure and trim if needed.


Row Three

The fastest row of all!

Cut
  • One 2 1/2 inch sqare in black
  • Two 5 1/2 strips of 2 1/2 inch height in white
Attach the sides to the "building block" and then press with iron.


Compiling the block

Sew each row together.


To line up the blocks I folded the middle block in half, gave it a quick press and used this to line up the blocks above it. The blocks have to line up or the effect will not look as good. Don't trust the perimeter of your rows, as due to stitch length the rows may be different lengths.

After the blocks are joined, sash the top and bottom in 2 1/2 inches height white, at a length or width of 12 1/2 inches.


This block will be bigger than the first two, but that is ok, as we are going to cut them all down to the same size before we sew them together.

Three blocks down, six to go!


Are following along with the Monochromatic quilting adventures? Let me know!

Sunday, 30 January 2011

Monochromatic Sampler: Block Two Tutorial

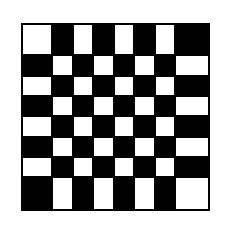
Ideally it would have been great for this block to have been the size of an actual Chess Board, But that would have either made the patches too fiddly or the blocks too big.


Preparing the strips

Take two 2 1/2 inch strips of fabric, black and white, and then cut them down the middle to make two 1 1/4 inch strips. Alternatively you can of course use scraps to make this block from all your other blocks at the end of the quilt.

Press and splice

Sew the two strips together, press and then cut in half and then sew together again, until you have eight alternating fabric strips sewn together. Remember to press, measure and trim if needed inbetween sewing each time to make sure that you get the size of your strips accurate. Each strip should be 3/4 inch thickness. I ended up pressing the seams towards the black rather than flat. It gives the black patching a raised look.

Pin and sew


Once you have a strip of eight together, slice them so that you have rows of 1 1/4 inch strips. I tend to pin from the centre of the row outwards. If there is a lot of difference in the seams, then try another piece. I only had to unpick two of my rows to make them line up.


Once you have your chess board constructed, make sure that the last row is 1 inch thick all around with your ruler.

Sashing the block

Once finished, sash the block in one 2 1/2 inch strip. the block itself might be a little larger than your first one, but don't trim just yet. Wait until we have all our blocks done first before we trim down.

An alternative way of construction might be to use Oh Franssons! Quick-piece tiny squares method of using interfacing to construct the chess board.

Are you joining in? Get your Monochromatic Sampler icon here and join upto the Flickr group and post your blocks.

Now I am off to clean my iron!

Friday, 8 August 2014

Top 5 Wall Mural ideas

In amongst all the specialist appointments for Nicholas and the general daily grind, our new Latitude 37 house has been slowly being built. At lockup stage, things are starting to get exciting, and so I am casting my mind to some interior design despite having a 2,500 word essay due in a weeks time.


We have wall in our back room dining space and I would love to do something dramatic but not too loud on it. Beside the wall will sit the dining table, adjacent to the white kitchen which will have a red glass splash back.

1. Australian Design

Excited was how I felt when I came across Lara Cameron's Birch Mural from The wallpaper company


I would probably aim for a more neutral colour like this one or dark grey birches on a white background.


2. Forest Image

Another possibility is some wilderness linking the outside with the inside. Pickawall have some lovely vibrant pictures in their collection.


This image would look spectacular, but I am not sure it would suit the space.


3. Monochromatic image

Or something monochromatic like this from photowall.


4. Cityscape

I am not sure I would go for Manhattan, probably something closer to home like Berlin or Glasgow.


5. Vintage

Even though this image has a watermark over it, you can see Luna Park


So what do you think? 

Have you had an experiences with Wall Murals.

Tuesday, 25 January 2011

Monochromatic Sampler: Block One Tutorial

I started doing the blocks for my Monochromatic Sampler on Saturday and since then have unpicked and re-sewn them. Why? I bought myself a 1/4 inch seam foot for my machine and I have decided that I don't like it. I would much rather use the regular foot, my masking tape seam allowance and press and trim to make sure that I get the fabric widths right. It does mean that I end up with lots of off cuts. But my daughter and her craft table doesn't seem to mind!


I guess I started with a simple block. For this one I cut two strips of 1 1/4 inch width sashes from your fabric. Or one 2 1/2 inch sash in half from a Jelly Roll.

First Row

For this block I started in the centre and I worked out. Cut two strips of 1 1/4 inch width pieces of fabric with your rotary cutter and rather than cut each section exactly, sew and trim.


Second Row

Once your first row is completed, press and trim and continue on with the sewing. Because this block is quite fiddly, rather than double back at the end of each row, reduce the stitch length. I use a little scrap of fabric at the end of each row that I sew onto after I have finished my stitching to hold the thread and reduce thread waste.

Third Row

It is important inbetween each row to square up your sides and make sure that your block has right angles.

Fourth Row

I decided that I would press my seams into the black areas of these blocks rather than press them open. Why? Given that I am dealing with so much white, it just looked neater and it makes the black sections look raised. I haven't decided what type of quilting to do just yet.


Fifth and final row

The last row is in 2 1/2 inch sashes. I fear that when I have all the blocks done, I will then trim this down, but until I know the exact sizes of my blocks this is what I am running with.


Finished width for my block was 10 3/4 inches which I might trim down to 10 1/4 once all the other blocks are done for the wall hanging.

Sunday, 13 February 2011

Modern Quilt Guild Monochromatic Challenge

I was excited when Scarlett from Craft Gossip emailed me to tell me that the Modern Quilt Guild is running a Monochromatic Challenge .. *giggles*


Unfortunately this competition is only open to US Residents, but I am chuffed that my tutorials are timely for at least someone out there!

Sunday, 20 March 2011

Dear Jane Quilt

Green Fairy Quilts linked to this, and I have fallen in love with the idea of this quilt ...


via Green Fairy

The detail in both the patchwork and quilting is breathtaking.


via Green Fairy

I can imagine that this quilt would be a long term project and definately a labour of love.


via That Quilt

I love the rainbow version, however, I can imagine it in either a monochromatic palette or white/grey/black palette.

You can buy the book here and here is the blog with instructions (But if you love it, buy the book and support your fellow crafter!).

Thursday, 3 February 2011

My Creative space ...

How often do you clean your iron?

While working on one my Monochromatic Sampler my iron decided to spew brown gunk all over one of my beautiful blocks. Not a good look when you are dealing with black and white fabric. So blogging about my blocks has come to a grinding halt until I can wash the block in question and clean my iron.

So I spent a few hours the other night cleaning my iron. I could have gone out and bought iron cleaner, (or even a new iron) but I wanted to see if I could use what I had in the house.

In the past if I accidently went over the wrong side of the iron-on interfacing, I would use a cloth with Eucalyptus oil to remove the sticky bits. This seemed to work well, but then left a slight residue. Hours of continuous use of the iron while sewing, had left the base plate with a brown residue on it (and inside it!). Researching online, I went with half vinegar half filtered water poured inside the iron to clean out the steam ducts.

While the iron was hot, I continued with the Eucalyptus oil and rag and did some hard yakka trying to remove some of the residue. It was a slow process. Some more research revealed that vinegar on a rag might work, so again, some hard yakka was involved trying to remove the brown residue. This worked moderately well, but not fast enough for my liking. I ended up using alternatively, pure vinegar and bicarb soda and it worked a treat. The burnt interfacing and material came away so easily with the bubbly reaction between the bicarb and the vinegar and it didn't seem to harm my non-stick surface.


As you can see, the base plate looks like a new iron and it works wonderfully. I used a rag on tongs to clean the iron while hot and an old toothbrush to get into the steam ducts. Once clean, I cycled the iron through some more vinegar/water and then clean distilled/filtered water to clean out the junk. Now I have a new iron (and a bin full of rags with brown gunk on them)!


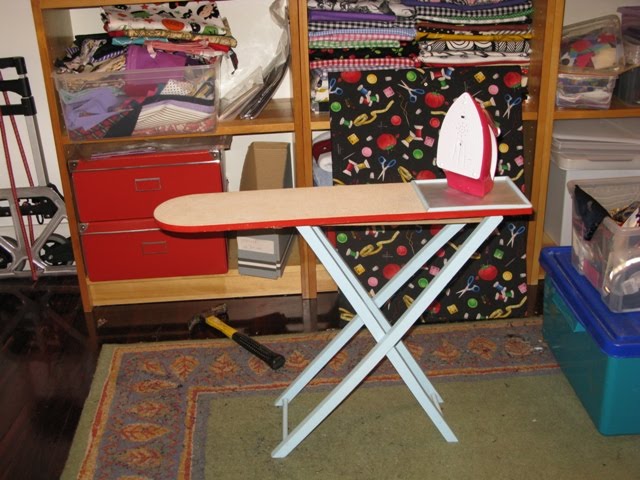
Of course, while doing this Victoria was hard at work cleaning her iron as well .. with tongs and a rag! The ironing board that she has once belonged to me when I was her age.

Of course, Tori doesn't normally play in my sewing room when I am using my iron. An accident just before Christmas 2008, has left her with a scar on her foot the size of a 50 cent piece. While endeavouring to have a "handmade christmas" she snuck up from behind and pulled on the iron cord and a hot iron fell on her. Bouncing off her left arm, left thigh and then it landed on her left foot. Quick action by Mum and Dad had her covered in wet towels and ice packs and at the Royal Childrens Emergency in 10 minutes.

In the picture below you can see her foot all bandaged up. And following the accident, we had 6 months of treatments in at the Royal Children's Burns unit. Now I never leave her in my room unattended and I tend to sew when there is no risk of her coming to "help me".


Now that my iron is clean, I can get back to the task at hand. I am working to a deadline, my due date is next Tuesday .. will I make it?

For more creative spaces this week, check out Kootoyoo!