Showing posts with label patchwork. Show all posts

Tuesday, 6 August 2019

Foxy Four Patch Baby Quilt (Part 4) Quilting and Binding

It took me ages to settle on the quilting method for this baby quilt. I tried some quilting samples using the machine, but wasn't happy with how it looked.

I wanted to go for something more delicate and "handmade" looking.

After unpicking lines of machine stitching and lamenting over my strategy, I found some Sue Spargo Embelishment Perle threads at Honeysuckle Patchwork in Bendigo and a beautiful orange gingham backing fabric.

A sample line of top stitching cemented my thinking and some tailors chalk kept me on track.


Really happy with how the stitching looked. I opted not to go through every square vertically, but I did every horizontal line of stitching. I liked the way that it looked.


Binding was done with orange home spun. I sew a 2.5 inch width strip of fabric (folded over so that it is 1.25 inches in width) sewn to the edge of the quilt and then I hand stitched around the edge of the quilt. I am hopeless at doing binding corners, so I just do one side at a time and try and make it look as neat as possible. I like the heaviness of the jelly roll strip binding.


The quilt has now been washed, pressed and gifted and it awaiting the arrival of it's new human!

Moving onto the next project!

Tuesday, 25 June 2019

Foxy Four Patch Baby Quilt (Part 3) Border Sash

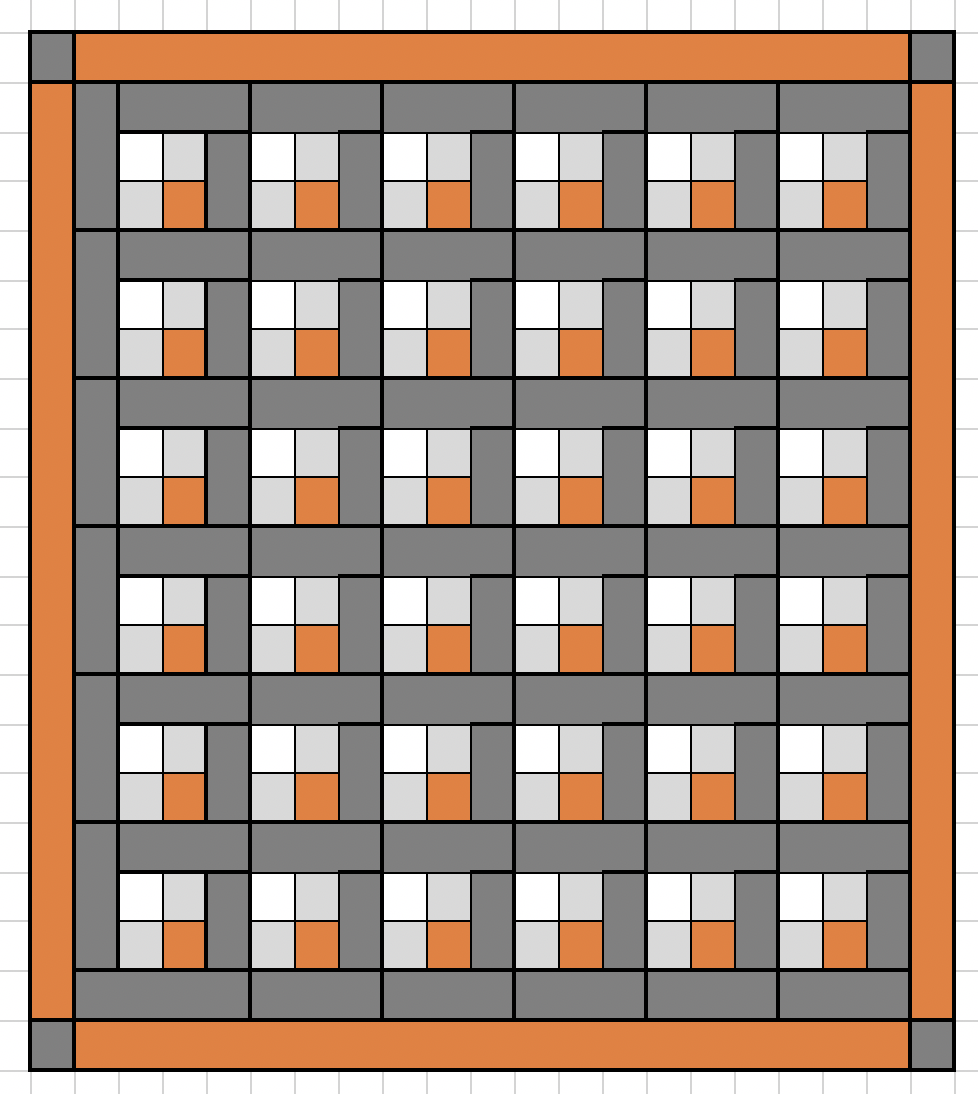
The next section to the quilt top is to decide how you want to sash or border your quilt.

Different colours or combinations will create different effects. An orange border will make the orange patches jump out in a different way to having a grey border.


You can sash the patchwork in the same colour, but I've opted to give each corner a small 2.5 inch square.

Sewing the sash

Sew the sashes onto the opposite sides of the quilt.


Then prepare a sash to be sewn to the top and bottom of the quilt. Getting the seams to line up might be a little tricky.


When attaching the top sash, I don't fully sew attach it. I use the iron to work out where the seam will be and then I trim and sew the corner square in place.


One the corner square is on the sash, finish attaching the rest of the sash to the quilt.

Voila! A finished four patch baby quilt.


Time to think about how to quilt it!

Thursday, 30 May 2019

Foxy Four Patch Baby Quilt (part 2) Constructing the patchwork rows

When working a piece of patchwork there are some big decisions that need to be made.

Do you create each four patch block, sash it and join it together (A) or sew half the sash to the four patch block and run a strip along the top of the blocks (B)?

Certainly (B) is a lot faster in the short term, but consider the advantages from doing (A).

Option A


If you make each individual block you can measure and trim with your rotary blade to tidy up any uneven sewing. When sewing the sections together make sure that your seams line up.

For ironing, I pressed the seams open on the initial four block design and then with the grey sash, I pressed the seam into the block to add a bit of bulk. The key to seams is being consistent throughout the whole project, however, many would argue that seams need to be pressed open.

Option B 

The B option, even through it seems easier, can lead to misalignment of seams running from the top to the bottom of your quilt.


I tend to like to construct each row using the method described in A, it gives me a chance to line up all the blocks and the extra seam at the top of the row allows me to line up the next row more easily.

It also means that you can either construct it as a row of blocks or a cluster of four blocks.


When I was putting this quilt together, I initially created a cluster of four blocks to see what the design looked like. This picture looks a bit squeegee because I haven't trimmed or steamed out the blocks yet to get them to align properly.


One of the reasons why I am reluctant to sew with my son around is because when doing patchwork you are continually sewing and ironing. So the iron is on all the time; set at cotton with lots of steam.

Nicholas is quite uneasy on his feet and when he starts wandering around the house, looking for cookies or a drink, he wants to get involved in what I am doing; which means moving parts on the sewing machine and a hot steam iron.

My anxiety levels go through the roof and sewing no longer becomes the joyful escape that it once was many years ago. But with him out of the house I can relax and enjoy the process, even though I tend to work like a demon to get my projects finished!

Ironing

The ironing is the most important part of making a quilt. You can use a hot steam iron to stretch fabric to line up seams or shrink fabric to meet a seam.

Creating each of the four patch blocks with grey sashing individually means that there is less likelihood of seams looking a bit off. You can steam and trim each block using your rotary cutter and ruler and make sure that things like up; as you go.


If the seams are a not straight, spray the block with water and use the steam iron to straighten them up. Iron until dry and press the back seams open. If you are pinning together blocks to sew them together and they are not aligning properly, pin them and then give the cotton a shot of steam to either stretch or shrink the fabric.

Here are some links about ironing and patchwork.

End of the row sash

Once you have finished a row, add the end sash.


Create 5 rows that look like this:


On the sixth row we will add the bottom row of sashing.


The inside of our quilt should look like this:


Press with an iron and trim the outside of the quilt ready for the border sash.

Tuesday, 28 May 2019

Foxy Four Patch Baby Quilt (Part 1)

Sewing and crafting is such a rare occurrence for me at the moment.

My son was given the opportunity to go on a weekend camp through one of the NDIS providers. So out came the sewing machine, a quick visit to Lincraft on the way home and I was set for a weekend of crafty goodness.

 Fabric selection from Lincraft

1 metre of the foxy fabric
2 metres of each of the greys
1 fat quarter of grey gingham
1x spool of grey thread

Here is the plan .... to make a four patch repeating block for a baby quilt.


Fussy cut the foxes out (the longest part of this process) and block each four patch with the darker grey.


I only had one fat quarter of gingham, so I had to use it sparingly.  


Sunday, 30 December 2018

Top 5 picks from the 2018 Top 100 #favequilts

I am chuffed to be listed again in the top 100 quilt patterns on favequilts. But I thought I would share my top 5 picks from the selection.

1. Blue Bargello Quilt Pattern

I love the mathematical feel of this quilt pattern and you could do some interesting things by playing around with the graduation and colours.


If you love this, just check out her rainbow version of this one!

2.  Full Moon Quilt Pattern

I love this because for me it references star wars. Choose some strategic use of star wars fabric and some appliqué this quilt would be loved by every fan!


3. Four Square Free Quilting Pattern

I just love the colours and the simplicity in this quilt. For me, it reminded me of the combinations of a 2x2 pocket rubiks cube.


I loved this one because it was a sampler type quilt. There were lots of flying geese patterns but this one stood out as challenging me (I know how hard those pin wheels can be).


I just love the idea of this triangle pattern and the accents throughout the quilt. Very sophisticated. Make sure that you check out her blog. Some beautiful quilts and ideas contained within!


These honourable mentions were quilts were too good not to mention.
  • Road to Oklahoma Quilt Pattern. Loved the way in which the designer used some simple patching techniques to create a quilt that looked complex and sophisticated.
  • Strip and Flip Quilt. simple yet effective. I think that this pattern could be easily knocked up in a weekend. You could also use the idea to use up scraps by making a jelly roll length of fabric from matching colours for each graduation. 
  • Aztec Charm Pack Pattern. Similar idea to the Oklahoma Quilt Pattern, take a jelly roll or some charm packs and experiment with basic blocks.
  • Church Picnic Quilt. I love the idea of doing a cathedral window quilt, but not the hard work that is involved! 
What do you think of my choices? Do you agree? 

Wednesday, 11 July 2018

Sixteen Patch Baby Quilt rides again!

It has been a while between patchwork projects, but my Sixteen Patch Baby Quilt tutorial keeps on generating traffic for the web site and it looks like crafters are enjoying the tutorial.


I recently received another email to say that the pattern was featured in FaveQuilts' collection of 24 Traditional Quilt Patterns and Quilt Blocks! Check out the great list of quilt patterns and projects.


Saturday, 20 February 2016

Mondrian inspired Society6 blanket

Society6 have their throw blankets marked down for today with free worldwide shipping.

I found this little patchwork or Mondrian inspired blanket.


I have washed a number of their products and the colour stay has been quite good.

Happy shopping!

Monday, 3 August 2015

Cathedral Window Quilt

At last a tutorial which makes quilting "cathedral windows" easy!

I'm loving the Missouri Star Quilt Co youtube video's. Instruction is clear and I like the fact that she uses a larger size of blocks to show you how it works rather than using 2.5 inch blocks.


I love both the complexity and simplicity of the Cathedral block.


Similar but different was the OhFransson Clementine Quilt using appliquéd quenelles to create a faux Cathedral look. The posts are no longer on her blog, but this picture from Pinterest gives you an idea of the loveliness of her design. She would either rule up the squares or sew squares together, then cover the seams with her quenelles. This charm pack from Missouri Quilt Company would be ideal for this design.


 [source]

Have you tried to make a cathedral windows quilt?

More Links:

Saturday, 1 August 2015

Patchwork inspiration at the British Library

There is patchwork inspiration everywhere!

OpenCulture put up an article on the images that the British Library have released into the public domain and I found this one in the "Flickr highlights" link.


Image taken from page 189 of 'The Chromatographic Chronicle of English History, illustrated by ... coloured charts, etc' 1864 [source]

I can see how this could translate quite nicely into an interesting quilt. Can you?

Thursday, 27 December 2012

Crafty Hexy necklaces

A while back I spotted this necklace by House of Harlow. A "hexy" necklace, rather lovely I thought.


House of Harlow have brought out another "Hexy" necklace ... probably a bit big for my physique .. but otherwise gorgeous.
via OhSoBoho  .. A bargain at 189 pounds!

If you like the idea of this, then here are some crafty or fabric alternatives ...


via Madz Has Runway which can be found at Gleaners in East Brunswick.


Have you made anything like this before?

Saturday, 22 December 2012

Thirty Six Officers Quilt Top Tutorial

Another idea taken from the mathematics fact book (of which I should really find the actual name so that I can link to it), is the "Thirty-Six Officers Problem". My last one was the Penrose Tile post.

Wikipedia states:

"The thirty-six officers problem is a mathematical puzzle proposed by Leonhard Euler in 1782.
The problem asks if it is possible to arrange 6 regiments consisting of 6 officers each of different ranks in a 6 × 6 square so that no rank or regiment will be repeated in any row or column. Such an arrangement would form a Graeco-Latin square."

Can't you see how this would be an ideal pattern for a quilt? 
I just love the mathematics of quilting!


So I started playing around with the idea as a basis for a larger project. In the original problem, you would have 6 squares of each colour displayed in a way that looks random, but isn't really.

Using a jelly Roll, you would need 15 inches (plus slack) for each colour for a block finish size of 12 inches x 12 inches (plus 1/2 inch each side seam allowance).

Nine blocks would make a good cot quilt, 35 squares a good single bed, 80 a good double or queen size, then add sashing and surrounds.


Using a Charm Pack you would need 6 squares (5 inches x 5 inches) for each colour for finished block of 27 inches x 27 inches + seam. 36 charm pieces are needed for the entire pattern (most charm packs are 42 squares worth, with two squares the same).  So buying a few packs of the same design would work wonderfully.

Using a layer cake, you would need 6 squares at (10 inches x 10 inches) for each colour. Each block would be 57 inches plus seam allowance.

It would look quite effective as an Autumn Colour Scheme.

And equally as nice as a monochromatic version.

Assembling the blocks:

What type of patchworker are you? If you are precise I would sew this quilt row by row. If not, sew four squares together to make a small block, measure and trim. Then sew another 4 together, and so on.  

But if you are not a quilter, this pattern could work equally well as a crochet blanket.

If you end up making one of these quilts based on these ideas, please leave a comment and let me know!

Enjoy!

Margaret  

Thursday, 15 November 2012

Missing patchwork

Do you think I am missing patchwork? We are in the final throws of the school year and I am busily writing reports and marking papers. Cant wait for a little me time!

Until then I will just play with my children's toast!

Sunday, 22 July 2012

Barbie Tote

It has been a while in between projects, but the other night Tori and I decided to make something for her friend Hannah who was turning 5 this week.

We had got her a doll for her birthday and Tori wanted a bag for the doll. So having previously lusted over the Nicole Mallalieu Craft Tote in Homespun 13.06, I decided to take a look at the project and adjust it so that it would fit a few dolls with pockets for clothes.

Nicole's instructions, as usual, were wonderful. Lots of detailed and tips and hints on how to do things better. But I did have my challenges, having a seriously fractured foot in a support "boot", and having to use my left leg to operate the sewing machine. Tori picked out the fabric for a bit of stash busting on the front. I sewed together a length of patching and then cut out the shapes for the zipped panel.

I only had black zips on hand, but I think that it makes it easier for a kid to see ... I didn't add in rings on the lid of the box, just a big handle that can go over someone's arm.


As you can see, Belle fits beautifully inside the "Barbie Coffin" (as a friend coined it on Facebook) and the pockets around the outside can be used for clothes.

My next task is to make one for Tori for her Barbies. I will probably put in the lid pocket that Nicole includes in her tutorial  in clear PVC for shoes and tiaras (as you do).

You can get a hold of the pattern by purchasing it through Zinio for $3.50 electronically and the pattern pieces can be downloaded here. I love the physical magazines, but I just done't have room for them. Electronic ones are good to bookmark and print off the pages that you want to work with for the projects you are doing.

How do you get your craft magazines? Physically from a newsagent, subscription or do you use Zinio as well?


Monday, 9 April 2012

Nine Patch Quilted Cushion and Bunting.

Ahh Easter Weekend, time to spend with family and friends and perhaps finish a few of my one thousand projects! Lovely Leanne hosts the blog, one thousand projects and I can definitely relate. I might not have 1000 projects kicking around, but ask my hubby and he will tell you that I probably have too many for my own good!

I knocked over another UFO, cushion for daughter and bunting from left overs. This project was finished before the "sarah" project, I've just posted them in reverse order!


When I started to decorate my daughters bedroom last year I wanted to make her as much handmade stuff for her room as possible. I started patching this pillow and then changed my mind about the type of sashing. I unpicked and then used the lovely Kokka linen that I found at GJ's in East Brunswick.


I quilted it with a layer of cotton batting, using calico as the backing fabric. Then I did some simple stitching around the outside of the nine patch using Perle. I used 4 different fat quarters for this plus 1/2 a meter of linen.

The cushion is made to fit a 50cm Ikea feather cushion insert.

But what about the offcuts? Well, I decided to make her some matching bunting for her bedroom wall.


In hindsight, I would swap around the bunting so that every second one is linen. I could even over-engineer it and do a matching linen love heart on every flag, but it is up on her wall now and looking lovely.

Another project done and dusted .. oh did I tell you that I am moving house on the weekend ... best pack a few boxes in between finishing those projects!