Sunday 31 October 2010

Lilo's Patchwork Creations

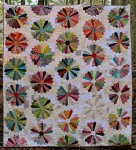
One of Andreas Mother's friends that the travellers visited in Germany is an avid patchworker. Far more dedicated than I am, she does everything by hand.


Check out the handywork on this, all the quilting done by hand


I guess I am too impatient to do a whole quilt by hand. I like doing some of the top stitching by hand but not the whole lot.

Do you know the name of this quilt design? Does it have a name?

I am already concoting ideas on how I might be able to do it by machine ...

Last day of Blogtoberfest

It is the last day of Blogtoberfest and it has been a long one. I was up at the crack of dawn with my Father-in-Law to pick up my hubby, daughter and Mother-in-Law from the airport.


Tori in Holzminden

We are now a family again and the chaos returns. Whilst I loved the slowness of the time apart, I missed them all terribly.

Glad that we have a few days up our sleeve before returning to work so that we can re-synch everyone's sleeping patterns. Both travellers had an afternoon nap and we managed to get Tori to sleep at 10pm. A bit late, but understandable given that she just returned from Europe.

Hubby took over 1,000 picture which still need to be sorted, including some lovely patchwork ones just for me!

Saturday 30 October 2010

Pot Holder Tutorial

I love my oven gloves, but sometimes they are a bit impractical when grabbing a hold of pots.


I previously made a friend a pot holder .. so here is the tutorial. Essentially it is a quilting block, layered with batting and a durable back.

Step 1: Feature Fabric

Fussy cut your feature image. Using your quilting ruler, allow enough 1/4 of an inch between your image and the outside of the 2.5 inch square.


Step 2: The first row of patching, 1 1/4 inch strips

I used a nice bold black border for my pot holder, but you could use whatever you like. I wanted a gap between my feature fabric and the outer border. I always cut my strips a slight bit larger than 2.5 inch and then press with an iron, and trim with a quilting ruler and rotary cutter afterwards to make sure that I have nice and clean sewing lines for the next row of patchwork.


Of course if you are doing a number of these blocks it is quite easy to do them in a batch.

Step 3: Press and trim

Once your first row of patching is finished, make sure you press and trim. The middle square should be 2 x 2 inches and the outside strips should be 1 inch in width. So all up 4 inches square. Use your quilting ruler to square up your creation before the next round.


Step 4: The next row of patching

Using your 2.5 inch strip, repeat the process. Please remember to press, measure and trim after each stage.


Step 5: Batting

I used double layer cotton batting, anything that prevents you burning yourself. If you have some old tea towels you could cut them up and use them if you wanted to. I used double sided fusable interfacing in between the fabric and batting to keep them in place before I quilted them. Of course you could use safety pins, but I was feeling a little lazy at this stage ...

You could hunt up some heat resistant batting if you wanted to, but because these were not oven mits, just pot holders, I decided to go with normal batting.

Step 6: Quilting
Grab your walking foot, ladies and gentlemen. I prefer a longer stitch length and thicker thread to add texture. The outside quilting lines are there purely to make attachment of bias easier. But if you are experienced and happy to play with pins then don't run these lines.

Step 7: Bias and hanging Loop

For my holder I used pre-cut polycotton 25mm thick bias. You can if you want round the corners to make the attachment process a little easier.

As for attaching the loop, you can either
a) put the loop in first and then bias around,
b) add the loop in half way through the bias process, or
c) do it at the start of the process.

I don't have a fool proof way of doing this, so I will leave it to you to experiment.

As with most bias, sew it on flip it over, press and then do your top stitch.
If you make a pot holder with this tutorial, please let me know so that I can link to your blog entry.

I hope that a few of you found this useful!
Please let me know!

The Practical Guide to Patchwork

I am getting very excited about this book at the moment written by Elizabeth Hartman of Oh Fransson! fame.


I can't wait to get my hot little hands on a copy. From what I have seen the projects look inspiring and most of all "different" from the usual guff you see in sewing books. I am particularly interested in some of her applique quilts.

She is currently having a blog tour to launch the book, so head over to Oh Fransson and check out who is reviewing the book.

Friday 29 October 2010

Etsy Friday Finds

My current design obsession is with putting together a unique piece of decorative patchwork using traditional construction techniques, applique and bias to re-create something that might have been designed by Frank or Charles.

Dover frank Lloyd Wright book bymisuhleyneeuhs . Starting with some inspiration, Dover Publications are always a good stop for source books on a designer or topic.


Frank Lloyd Wright Decal Set by Hutch Me

These decals are just gorgeous, I can imagine them in my study, although I would need 4 ..

Frank Lloyd Wright inspired Embroidery by Clever Fingers. Something fiddly for the embroiderers. Not a bad idea to do a sample of what I am thinking about.


Frank Lloyd Wright inspired Welcome Sign by Kopper Kitty. I Love this welcome sign, but not too sure if it would match the front of my house. Theoretically it should given that my shack is bungalow inspired.


Frank Lloyd Wright inspired stained glass Window Panel by Stained Glass by Dianne. I figured that if they can do it in glass, I can do it in fabric.


What is inspirng you today?

Thursday 28 October 2010

Happy Birthday Hubby

For the first time in many years, my husband and I are apart on his Birthday.


He is in Germany with my gorgeous daughter, probably walking through Hamburg right now looking at model train shops.


Scrubs up nicely doesn't he!


Happy Birthday my beautiful husband, my lover, my friend.

Wednesday 27 October 2010

Wordless Wednesday

I can't wait for Sunday, until I see her again ...


Tuesday 26 October 2010

Frank Lloyd Wright

I've been looking for ideas to make a wall hanging. Something to hang in the space over my front door that you can see from within the house.

I want it to be patchwork/applique project.


I've been looking at some Charles Rennie MacIntosh and then I found this coaster design based on the works of Frank Lloyd Wright.


Can't you just imagine a quilted piece on these ideas?

Monday 25 October 2010

Paluma Prints

I love stumbling across new artists and products that I think are unique. I came across Paluma Print, a business based in Queensland. Still a young one, her blog documents her journey into small business and her life.


Her prints are mainly botanicals, and I love what she has done with them. Tea Towels, placemats and then she has made a range of bags out of them as well


Visit her blog and take a look at here lovely homewares!

Sunday 24 October 2010

Jelly Roll Baby Quilt Tutorial

I had a few friends around yesterday for a bit of a quilting/sewing day. I started on another baby quilt. This time using the jelly roll that I got from Green Fairy Quilts.


The idea was to use 16 different strips and path them together into colourful blocks.


But if you look closely, you can see that there are 4 squares that are not from the Punctuation range, they are from an older Moda range called Breath of Avignon. When I sat back and looked at the colours, I decided I wanted more solids.

So in a bid to document a bit more what I am doing, here was my process:

1. Take 16 1/2 strips of different colours and sewed them into blocks of 4, use the full strip if you want it to be a larger quilt.


2. Pressed them out and then with my rotary and ruler cut 2.5 inch strips.


3. Once you have your different strips cut, then sew them together. For my quilt, I mixed up the order a bit in each block. But for the purpose of this tutorial, I am not going to mix the colours up.

4. Once you have your 9 or more blocks, start to add the sashing. I cut a length of Kona Solid Snow at 2.5 inches and then sewed each block to it, pressed it with the iron and THEN cut the individual blocks. In the end I had a stack of blocks that looked like thi.

5. Trim each of your blocks so that they are nice and straight using your ruler and rotary cutter and start assembling the rows of patchwork. Adding a sash to the top of the row so that you have three rows with top and side sashing. The bottom row gets a bottom sash. If you complete each row at a time, the off cut from the large horizontal sash, should be enough to do one of the vertical sashes.


6. Once you have sewn the main part of the quilt together to make it bigger you can add a few more rows of sashing. I am thinking of doing something different and adding different colours to border my baby quilt from the Punctuation range. What do you think?


7. Once you have finished the top, then it is time to baste to batting and a backing colour and then bind. I am thinking of doing some patchwork binding from the left overs, so that it isn't the same colour all around, but patches of the colours that are inside. I am not sure yet. More details later!

What do you think?
Has this tutorial been handy?
Please let me know if my instructions are clear!

Thursday 21 October 2010

Froggy Goodness

The "house" group that I am in at school has the frog as it's theme.


As an end of year "gift" every teacher was given a luvly chocolate frog and one parent made froggy cup cakes for every student in that house. Did we feel special or what?

Wednesday 20 October 2010

Good luck class of 2010

This week is the last week of classes for Year 12's 2010 at my school.


Year 7 Camp 2005 Mt. Stirling

For me, the graduating class was the first time I was a Year 7 tutor and I loved it. I met so many lovely kids and I feel quite proud that I had a chance to teach them but also sad that they are leaving. I've been cutting onto DVD some pictures from the Year 7 Roman Feast and other events that I shared with them in 2005.

Of course it is only the start of their journey and many years from now they will have forgotten their years at High School.

Class of 2010, I wish you all the best for the next stage in your journey and hope that you find the time to come back and tell us the stories of the next part of your journey. May you receive the exam results that you have worked hard for.

Tuesday 19 October 2010

The promise of summer

With the weather report saying that the temperatures are going to go up over 20 at the end of the week the promise of summer is around the corner.

I found these picture from last year's visit to the Collingwood Childrens Farm.


For someone so small, Victoria is never afraid of animals.


The first Sunday of each month they have a family day with free pony rides from 10.30 - 2.30pm. On the second Saturday of each month there is a Farmers Market.

Monday 18 October 2010

Sia - Breathe Me

Day 18 of Blogtoberfest brings you Music Monday (tah dah!)

What would be the first song that would appear in iTunes (or any other music broswer) if you pressed random or shuffle?

My itunes skipped onto Sia, an Australian artist from Perth.


If you haven't heard any of her work, then hunt her out. One of the tracks "Breathe Me" was used at the very end of the final episode of Six Feet Under and it left me in tears! I might just dust those DVD's off at the end of the year and re-watch that magnificent series.

I notice that Sia has been nominated for six categories at this year's ARIA awards. Her single "clap your hands" is nominated for Single of the Year. Not a bad song, but I much prefer hear earlier stuff.

For more Blogtober-festivities, head on over to this page where all that are participating are listed.

Sunday 17 October 2010

Do you know about Green Fairy Quilts?

I thought I would do a bit of a Blogtoberfest shout-out ... Green Fairy quilts doesn't have the most comprehensive range of fabrics, but they do have Jelly Rolls and pre-cuts that are really cheap. Especially if you are in Australia at the moment.

The last jelly roll that I ordered from them was "Punctuation" by American Jane. I love the colours and the theme of the fabric, this crafty pool on Flicker inspired me to grab a roll for my stash, although there are no plans in the next week with reporting due to make anything with it!


Make sure you are on their mailing list, that way you get all the discounts and specials that they have every few weeks.

At the moment they have Jelly Rolls at $25.95 US ... what are you waiting for? Get over there and order something!

Are you enjoying Blogtoberfest? Head on over here to see who else is joining in!

Saturday 16 October 2010

More things for Germany

My Mother-in-Law wanted to take some handbags to Germany, and supplied me with the front material for them that she found at a craft show.


I did one of them in a rustic red inside


And I did the other I did in a type of dot fabric, but it matched well with the front design.


There were also some toy bags that needed to be made as well with the name of the boys embroidered on them.


The happy travelers have arrived in Munich and I had a skype session with them last night, but only they could see me (dodgy camera). We are going to have another go tonight.

Friday 15 October 2010

Off on a big adventure

My little girl and hubby are off on an adventure to Germany for 2 1/2 weeks leaving Mummy all by herself. Just Mummy and her sewing machine.


Tori was very excited that she could "drive" her own case!


The determined little thing that she is, she wouldn't let Mummy help.


Not sure where the hat came from, but she felt the need to wear one.


Using the colouring in books I made.

Thursday 14 October 2010

Colouring in Books

I lamented over what to do about colouring in books for Tori on the long flight to Germany (and beyond). The $2 shop has a nice assortment, but they tend to be character based and LARGE! We tend not to give her a lot of "branded" things to play with. So I started to hunt about for images to make some for her (because there isn't enough to do already).


I came across Raising our Kids which has a great collection of colouring in pages and "how to draw" pages that are quite educational. I combined those images with some of the Waybuloo's, Thomas the Tank and some Crayola Travel Bingo pages and voila. Photocopied 2 to a page, flip on short side. There are also some blank pages as well scattered throughout the books.


I then used a leather needle and thick thread on my trusty Janome to bind them. Tied the ends down and then stuck them to the spine.


We then gaffa taped the spines down to secure the stitching.


She has a collection of these colouring in books, along with some activity packs with stickers and glitter pens that Dad can grab for various parts of the trip when she needs some extra distractions. We opted not to go for the glue, only because it is a bit messy. But she does have a glue stick and scissors that she can play with when she gets to Germany.