Showing posts with label Craft. Show all posts

Tuesday, 8 October 2019

Making your own book weight


A friend has this beautiful leather book weight that she uses when she has to power read though a book. In lieu of one, I used my grain filled heat pack to keep the pages open as I was ploughing my way through the Margaret Attwood book, "The Testaments", last week.

But here are some crafty alternatives if you have a spare afternoon.

Simple Book Weight
Martha Stewart has a simple pattern for a book weight to keep her cook books open.

Book Weight Carrot
I love this idea and I can see it being done in lovely patchwork fabrics in orange and green.


Book Bone

This is a pattern for a soft toy bone. But simply replacing some of the filling with weights, would make it into a lovely Book Bone to hold your pages open.


Once you start looking at soft toy patterns there are so many possibilities. Bendable snakes, Sea Horses or little starfish as weighted objects to keep your book pages open. If you are not in a crafty mood you can buy a soft toy and open it and fill it with weights.

Wednesday, 31 July 2019

How to make Harry Potter Wands

It is Harry Potter day on Wednesday 31st July and the daughter and I decided to make some wands for the display in my School Library (Learning Commons).

What you will need:
  • Sandpaper
  • Old Chop sticks or twigs from the garden. Make sure that they are nice and dry.
  • Glue Gun
  • Glue
  • Primer
  • Paint (acrylic)
Step 1:

Make sure that your chop sticks are nice and clean, just run some sandpaper over them to take off any rough edges (or left over food).

Step 2:

Using the glue gun, start to built up the shape of your wand. Once you have applied the glue, dunk it into a tumbler of cold water to set the glue and then move onto the next wand.

Step 3:

One the wands are dry again, prime them with a base colour, we chose black.

Step 4:

Once the prime colour is set, use acrylic to dry brush your colours onto the wands. We used some acrylics that we got from the cheap $2 shop.

Step 5:

If you want, you can coat your wands in clear lacquer to protect the paint.


Enjoy! 

Monday, 30 April 2018

5 inspirational hot water bottle covers

Here are some gorgeous hot water bottle covers for inspiration if you are looking to create something for the Opendrawer Hottie Challenge.

1. Fox knitted hot water bottle cover

If only I could knit!

2. Toothless hot water bottle cover

My daughter loves dragons, she would kill for me to make this hottie cover.


Love these PDF patterns for hot water bottle covers, they have a lovely range. However, I haven't tested their patterns. The Sarah the racoon is my favourite!


4. Crochet Grannie square hot water bottle cover.

Foxes Lane has a great tutorial on making a Grannie-hottie.


5. Mushroom House 

I love the feel of this hot water bottle cover.

Wednesday, 18 April 2018

Opendraw Hottie Challenge 2018

It was welcomed news last night to see that OpenDrawer in Camberwell are holding another hottie challenge.

 OpenDrawer Hottie Challenge 2018


In 2011 I participated in their Hottie Challenge and I am seriously thinking of doing it again, it was such a fun process and event to be part of.


Entries have to be submitted by the 31st May and there is a $10 entry fee. Money raised will go towards SisterWorks, a non-profit social enterprise supporting women who are migrants, asylum seekers or refugees to become financially independent and happily settled in Australia.

So if you are interested in a quick crafty project this weekend, knock up a Hottie and support OpenDrawer and SisterWorks.

Wednesday, 20 January 2010

Paintbox Quilt Update

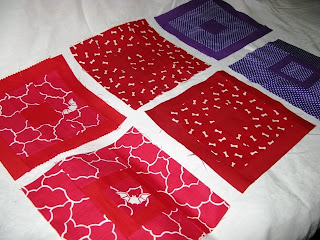
I decided to go with the current block design for the Paintbox Quilt. I spent far too long fiddling with colours from my Kona roll and the fabric I had, and then decided to take the advice of Elizabeth and go for monochrome prints. I think that they look better than what I started with, vibrant. I might not be able to use all the quilt fabric for Tori's birthday in this one, but it will look good and I have other ideas for a picnic blanket for her with the rest of the fabric.


The bat fabric is a Kokka Echino print from a few years back, I generally use this print to do baby shoes.

So I have done 5 sets or 10 blocks so far. The first one took me ages, until I found my rhythm. Now it takes me about 20 minutes to do 2 blocks, providing I don't get distracted! I am going to do the 32 colour Paintbox Quilt, with the new design ... so 5 colours down!


I do two blocks at the same time. Using two 2 1/2 inch strips I cut out 3 pattern and 2 block colour squares and then I sew them in tandem. Measure, Cut, Pin, Sew, Press, Trim if needed.


I work from the inside out and then with the left over pieces of fabric I quickly stitched them together and pressed them out so that perhaps I can make a mini-quilt from them one day.


I took the blocks along to my inlaws on Tuesday night and my daughter took a liking to the mini-blocks that I had done and spent ages sorting through them on the table and playing with them. I figure by the time the Single Bed Quilt is finished, I will have enough mini-blocks for either some matching cushions or perhaps a cot quilt for my shop.
Reblog this post [with Zemanta]

Saturday, 3 October 2009

Sisters Market October 3rd

After reading that just about everyone had a stall at the Sisters Market today, Tori and I wandered off for a look-see.


Anna from Polly Pratt was tucked inside the front door with lots of her handmade goodies. I promised I would take lots of pictures as her camera was broken :(


Jay was there with little Miss Finki who was busily creating scarfs behind the Finki stall.


Michelle from Mecino was there with her lovely jewelry ... she'll be there at Northside Makers Market next weekend.


There was lots of other stall holders as well, such as Rabbit and Duck and Chuckles. As for Tori, she was strapped to my back in our "packy". Randomly pulling on my hair and demanding more "crackers" ...


Thursday, 1 October 2009

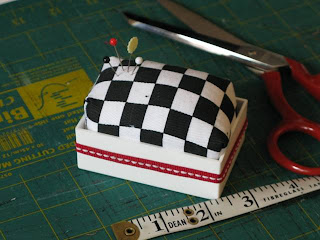
Moo Pin Cushion Tutorial

It has taken me long enough to put this tutorial together ...


The tutorial is designed to make use of all those white boxes you have floating around from your moo business cards. I know that they are pretty popular in the craft world ... so lets get started!

Step 1: Cut Fabric


Cut a rectangle of fabric 5" x 7". Thicker fabrics work better than thin ones, but you could put iron on interfacing on the back to stiffen it.

Step 2: Fold and Pin


Fold the shorter sides together and pin. This is the side that we are going to use to turn it inside out and stuff! So make sure you leave enough room to turn your pin cushion inside out. I generally leave about 2 inches, but if you think that 2 " is too small, just test your hand size.


Step 3: Stitch It


The stitching does not have to be symmetrical as you are not going to see it. Make sure you double back with your machine so that when you turn the pin cushion inside out the stitching does not come undone. I have left 0.5cm seam allowance, using the guide on my machine. This project doesn't thrive on exactness, so it wouldn't matter if the seam was 0.5 or 0.8cm ...

Step 4: Press open


I always like to press my seams open so that when I come to stitching it together the seams are nice and straight (even though you won't see it).

Step 5: Sew the ends together


Sew the ends of your pin cushion together.

Step 6: Create the corners


Creating the corners is a bit tricky. Fold down each corner so that they area triangle. Then we stitch the corners down. I usually use the 1.5cm guide on my machine to do these, but you can see the inch length in the picture. Stitch, pin, press and then sew each corner until you get an object that looks like this.


Step 7: Turn inside out and stuff


I generally don't bother to trim the corners, especially for a pin cushion. I use the stuffing from an old cushion, but you could use felt offcuts, or anything else that is going to make it possible to stick pins into. Stuff the stuffing in and then slip stitch the pin cushion shut.

Step 8: Mount it


Your stuffed pin cushion should fit inside your moo box. To stick down you need to score the surface of the plastic with sandpaper so that it is rough, then use some heavy duty glue to glue it into place. Place glue on the bottom of the box, around the inside of the box then insert your pin cushion.

Step 9: Embellish it

You can add some ribbon around the box so that it doesn't look like a moo box anymore!


Step: 10: Stab it with pins!

If you end up making a pin cushion using this tutorial, please leave a comment and let me know where you have blogged about it!
Reblog this post [with Zemanta]