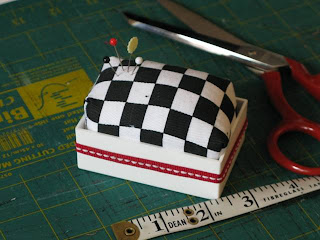
The tutorial is designed to make use of all those white boxes you have floating around from your moo business cards. I know that they are pretty popular in the craft world ... so lets get started!
Step 1: Cut Fabric
Cut a rectangle of fabric 5" x 7". Thicker fabrics work better than thin ones, but you could put iron on interfacing on the back to stiffen it.
Step 2: Fold and Pin
Fold the shorter sides together and pin. This is the side that we are going to use to turn it inside out and stuff! So make sure you leave enough room to turn your pin cushion inside out. I generally leave about 2 inches, but if you think that 2 " is too small, just test your hand size.

Step 3: Stitch It
The stitching does not have to be symmetrical as you are not going to see it. Make sure you double back with your machine so that when you turn the pin cushion inside out the stitching does not come undone. I have left 0.5cm seam allowance, using the guide on my machine. This project doesn't thrive on exactness, so it wouldn't matter if the seam was 0.5 or 0.8cm ...
The stitching does not have to be symmetrical as you are not going to see it. Make sure you double back with your machine so that when you turn the pin cushion inside out the stitching does not come undone. I have left 0.5cm seam allowance, using the guide on my machine. This project doesn't thrive on exactness, so it wouldn't matter if the seam was 0.5 or 0.8cm ...
Step 4: Press open
I always like to press my seams open so that when I come to stitching it together the seams are nice and straight (even though you won't see it).
Step 5: Sew the ends together
Sew the ends of your pin cushion together.
Step 6: Create the corners
Creating the corners is a bit tricky. Fold down each corner so that they area triangle. Then we stitch the corners down. I usually use the 1.5cm guide on my machine to do these, but you can see the inch length in the picture. Stitch, pin, press and then sew each corner until you get an object that looks like this.
Step 7: Turn inside out and stuff

Step 8: Mount it
Your stuffed pin cushion should fit inside your moo box. To stick down you need to score the surface of the plastic with sandpaper so that it is rough, then use some heavy duty glue to glue it into place. Place glue on the bottom of the box, around the inside of the box then insert your pin cushion.
Step 9: Embellish it
Step 5: Sew the ends together
Sew the ends of your pin cushion together.
Step 6: Create the corners
Creating the corners is a bit tricky. Fold down each corner so that they area triangle. Then we stitch the corners down. I usually use the 1.5cm guide on my machine to do these, but you can see the inch length in the picture. Stitch, pin, press and then sew each corner until you get an object that looks like this.
Step 7: Turn inside out and stuff

I generally don't bother to trim the corners, especially for a pin cushion. I use the stuffing from an old cushion, but you could use felt offcuts, or anything else that is going to make it possible to stick pins into. Stuff the stuffing in and then slip stitch the pin cushion shut.
Step 8: Mount it
Your stuffed pin cushion should fit inside your moo box. To stick down you need to score the surface of the plastic with sandpaper so that it is rough, then use some heavy duty glue to glue it into place. Place glue on the bottom of the box, around the inside of the box then insert your pin cushion.
Step 9: Embellish it
You can add some ribbon around the box so that it doesn't look like a moo box anymore!
Step: 10: Stab it with pins!
If you end up making a pin cushion using this tutorial, please leave a comment and let me know where you have blogged about it!


.JPG)


2 comments:
So cute! Such a great idea. Makes me want to order some Moo cards just to make one!
What a great idea! I'm using one of my Moo containers to house my blunt and broken needles.
Post a Comment